Showing posts with label Cassie. Show all posts
Showing posts with label Cassie. Show all posts
Monday, November 30, 2015
UHeart Organizing: A Clever Kid's Book Caddy
My gal pal, Cassie of Hi Sugarplum, is a superstar when it comes to creating high-end trendy looks, on a shoestring budget. She also has a love for bold colors, so I always get excited to see what she is up to and I just lovity love her style (in both home and fashion). She is stopping by today to share with us her super savvy solution for corralling her daughter's favorite reading materials (but this could totally work for little boys and adults as well!) Take it away Cassie!

Hey there, friends! I'm excited to be back over here on Jen's gorgeous blog...a place of so much creativity and ingenuity! Not to mention, she's got some of the sweetest readers around! Speaking of readers (how you like that segue?!), my daughter recently graduated to 'chapter books', and all of a sudden, she can't get enough of books and reading time!
Obviously, this makes a mama's heart happy, and I want to do everything I can to encourage her. When we created her Big Girl Room, we carved out a secret reading nook, but her room was lacking in bookshelves. I looked around online, and fell instantly in love with this Land of Nod book caddy...but didn't love the $150 price tag! #ouch Plus, it's a little too big for her small room.
So I decided to get crafty and create my own out of a bamboo drying rack! It's available at various retailers, but I picked up this one from Container Store.

A few quick coats of bright yellow high gloss spray paint, and a book caddy was born! Oh, and did I mention it was only $20!? #score


It's sturdy enough to hold her heavier hard-back books, but still folds up and tucks away when you need a tidier space.


Each week, she loads it up with new favorites, then has them all at her fingertips. I love to see what books she chooses, as well as the other treasures she stores in it. I'm thinking of making another one to hold magazines in our family room.

Do you remember the Little Miss series? These were mine as a child, and I still remember my grandfather reading them to me. I love that she wants to hang on to them, even though her reading level has grown.

We currently keep the book caddy near her art center (which I cleaned up for pictures, don't be fooled into thinking she's this tidy!), so it's a whole corner of imagination and creativity!


Is there anything better than seeing your kiddo voluntarily reading? Or the peace and quiet that comes with it?! ;) Thanks for letting me share! I'd love to hear how you corral all the books in your kid's rooms.

 "Hi, I'm Cassie, a DIY and design-obsessed Texas girl, and lover of travel, fashion, sarcasm and Mexican food. When I'm not hanging with my sweet and funny family, you can find me kicking the '80s out of our home, one budget project at a time, on my blog Hi Sugarplum!"
Read more »
Hey there, friends! I'm excited to be back over here on Jen's gorgeous blog...a place of so much creativity and ingenuity! Not to mention, she's got some of the sweetest readers around! Speaking of readers (how you like that segue?!), my daughter recently graduated to 'chapter books', and all of a sudden, she can't get enough of books and reading time!
Obviously, this makes a mama's heart happy, and I want to do everything I can to encourage her. When we created her Big Girl Room, we carved out a secret reading nook, but her room was lacking in bookshelves. I looked around online, and fell instantly in love with this Land of Nod book caddy...but didn't love the $150 price tag! #ouch Plus, it's a little too big for her small room.
So I decided to get crafty and create my own out of a bamboo drying rack! It's available at various retailers, but I picked up this one from Container Store.
A few quick coats of bright yellow high gloss spray paint, and a book caddy was born! Oh, and did I mention it was only $20!? #score
It's sturdy enough to hold her heavier hard-back books, but still folds up and tucks away when you need a tidier space.
Each week, she loads it up with new favorites, then has them all at her fingertips. I love to see what books she chooses, as well as the other treasures she stores in it. I'm thinking of making another one to hold magazines in our family room.
Do you remember the Little Miss series? These were mine as a child, and I still remember my grandfather reading them to me. I love that she wants to hang on to them, even though her reading level has grown.
We currently keep the book caddy near her art center (which I cleaned up for pictures, don't be fooled into thinking she's this tidy!), so it's a whole corner of imagination and creativity!
Is there anything better than seeing your kiddo voluntarily reading? Or the peace and quiet that comes with it?! ;) Thanks for letting me share! I'd love to hear how you corral all the books in your kid's rooms.


Friday, November 27, 2015
UHeart Organizing: Shut the Craft Door
One of my favorite things to do is to curl up with a cozy blanket, a cup of coffee and a good storage book or magazine. Flipping through page after page of colorful and streamlined storage solutions is oddly comforting yet invigorating at the same time. It is a passion I have had for so many years now, and for me it never gets old.
I find myself most drawn to organized playrooms, craft rooms and home offices. I just love that these spaces are ones that allow you to let go and play with color. My eyes get all big and heart shaped whenever I see lined up craft paints and acrylic drawer dividers with bright gift wrap showing through. #majorweakness
So when my fellow color lovin' friend, Cassie of Hi Sugarplum, shared her recent craft closet with me, I couldn't hold back my excitement. She paired the ever-so-incredible Elfa system (yes please) with her beautiful supplies to create a very practical and drool worthy solution. What I love most is that someone could essentially store and entire craft room worth of supplies on a single door (so no craft room needed). But as much as the point is to conceal everything behind closed doors, I am not sure I would ever want to shut these craft doors. Here she is to share more details so you can have the same heart eyed reaction I did.

Hello my fellow organizing fanatics! I'm so excited to be back on Jen's rockstar blog sharing my latest organization overhaul with you. Our families vacationed together last week, and in-between riding the waves and whipping up batches of icy cocktails, I picked her brain for tips and ideas! So not only was it an amazing trip, but I also came home motivated to whip every nook and cranny of my house into efficient, organized shape!
We've been in this new home about six months, and in that time we've remodeled the Kitchen and given the Master Bedroom a makeover. The design of the remaining rooms is coming along slowly as well, but I have stalled in regards to some of the major organization spots for our family... like a Command Center, Mudroom, and Craft Closet (click the links to see how we did them in our last house).
I'll admit I've been paralyzed with indecision, so much so, that six months later, this was the state of our craft and wrapping supplies. Not real convenient for a blogger with a creative daughter!

I'm lucky enough to have a spare bedroom with an amazing double-door closet... A prime spot for an office with perfect craft storage. (We're looking at the doors and vaulted ceiling, not the wallpaper border left behind by the previous owner! That's Project #187 on our list!) But without clear direction, I let my uncertainty prevent me from even getting started. Finally, I read back over my mantra for last year... and decided to just start somewhere! Besides, it could only get better, right?!

I already had a Container Store Elfa system for our gift wrap, and it fit perfectly on the inside of one door.... So I decided to utilize the other closet door with the same system for many of our craft supplies. I typically bring home an assortment of baskets and sizes to see what works best, then return the others.
Tip: There are several lower-priced door storage options, but I've found the Container Store's to be the most sturdy. So I wait for one of their big 25-40% off sales to stock up!

I'm proud to say the contents of four boxes of craft supplies are now neatly organized on this single door...and more importantly, they are finally accessible! Roll that beautifulbean craft footage!

I'll break it down for the detail-oriented crowd. #mypeople
Basket 1: Pails of pencils, markers, paint & stain pens, scissors, rotary blades, and the taller items like Modge Podge and sealant.
Basket 2: Specialty paints and finishes

Baskets 3 to 5: Craft paints (in rainbow order, because, duh!)

Basket 6: Pails of brushes, foam brushes & daubers, tubes of Rub 'n' Buff, clips & rubber bands
Tip: Small buckets from the Target Dollar Spot are perfect for corralling and separating supplies. Yep, I basically just wrote you a permission slip to shop at Target!
Basket 7: Specialty papers, contact paper, wallpaper samples...these are used mostly for craft projects like this, and lining drawers or covering walls like this.


How about one more pic of the paints just to get our hearts racing?

Another plus of this system, is how easily my existing gift wrap station transported to the new house... I just reattached it to the door, tidied it up a bit, and was good to go!

Baskets 1-3: Assorted ribbons

Basket 4: Gift tags & ribbon remnants
Basket 5: Gift bags & tissue, pail of tapes & scissors

Basket 6: Wrapping paper
Tip: To hold tall tubes of paper, use a deep basket at the bottom, and a gift wrap rack for the top.

Clearly I share Jen's weakness for pretty papers, and HomeGoods just feeds my addiction!

I'll admit, these organized doors are now part of the tour when friends come by to see the new house... And I may open them with Vanna White flair! #okayItotallydo (We're looking at the doors, not the inside of the closet!)
Well obviously, now you're looking at the inside of the closet... that will be Phase 2.... Let's focus on the delightfulness of Phase 1 for now! I'm just thrilled to have all our craft and wrapping supplies out of boxes, and at our fingertips! And I crossed the biggest hurdle... Getting started!!


See more of our Organized Spaces here, and Home Tour here.

"Hi, I'm Cassie, a DIY and design-obsessed Texas girl, and lover of travel, fashion, sarcasm and Mexican food. When I'm not hanging with my sweet and funny family, you can find me kicking the '80s out of our home, one budget project at a time, on my blog Hi Sugarplum!"
Read more »
I find myself most drawn to organized playrooms, craft rooms and home offices. I just love that these spaces are ones that allow you to let go and play with color. My eyes get all big and heart shaped whenever I see lined up craft paints and acrylic drawer dividers with bright gift wrap showing through. #majorweakness
So when my fellow color lovin' friend, Cassie of Hi Sugarplum, shared her recent craft closet with me, I couldn't hold back my excitement. She paired the ever-so-incredible Elfa system (yes please) with her beautiful supplies to create a very practical and drool worthy solution. What I love most is that someone could essentially store and entire craft room worth of supplies on a single door (so no craft room needed). But as much as the point is to conceal everything behind closed doors, I am not sure I would ever want to shut these craft doors. Here she is to share more details so you can have the same heart eyed reaction I did.
Hello my fellow organizing fanatics! I'm so excited to be back on Jen's rockstar blog sharing my latest organization overhaul with you. Our families vacationed together last week, and in-between riding the waves and whipping up batches of icy cocktails, I picked her brain for tips and ideas! So not only was it an amazing trip, but I also came home motivated to whip every nook and cranny of my house into efficient, organized shape!
We've been in this new home about six months, and in that time we've remodeled the Kitchen and given the Master Bedroom a makeover. The design of the remaining rooms is coming along slowly as well, but I have stalled in regards to some of the major organization spots for our family... like a Command Center, Mudroom, and Craft Closet (click the links to see how we did them in our last house).
I'll admit I've been paralyzed with indecision, so much so, that six months later, this was the state of our craft and wrapping supplies. Not real convenient for a blogger with a creative daughter!
I'm lucky enough to have a spare bedroom with an amazing double-door closet... A prime spot for an office with perfect craft storage. (We're looking at the doors and vaulted ceiling, not the wallpaper border left behind by the previous owner! That's Project #187 on our list!) But without clear direction, I let my uncertainty prevent me from even getting started. Finally, I read back over my mantra for last year... and decided to just start somewhere! Besides, it could only get better, right?!
I already had a Container Store Elfa system for our gift wrap, and it fit perfectly on the inside of one door.... So I decided to utilize the other closet door with the same system for many of our craft supplies. I typically bring home an assortment of baskets and sizes to see what works best, then return the others.
Tip: There are several lower-priced door storage options, but I've found the Container Store's to be the most sturdy. So I wait for one of their big 25-40% off sales to stock up!
I'm proud to say the contents of four boxes of craft supplies are now neatly organized on this single door...and more importantly, they are finally accessible! Roll that beautiful
I'll break it down for the detail-oriented crowd. #mypeople
Basket 1: Pails of pencils, markers, paint & stain pens, scissors, rotary blades, and the taller items like Modge Podge and sealant.
Basket 2: Specialty paints and finishes
Baskets 3 to 5: Craft paints (in rainbow order, because, duh!)
Basket 6: Pails of brushes, foam brushes & daubers, tubes of Rub 'n' Buff, clips & rubber bands
Tip: Small buckets from the Target Dollar Spot are perfect for corralling and separating supplies. Yep, I basically just wrote you a permission slip to shop at Target!
Basket 7: Specialty papers, contact paper, wallpaper samples...these are used mostly for craft projects like this, and lining drawers or covering walls like this.
How about one more pic of the paints just to get our hearts racing?
Another plus of this system, is how easily my existing gift wrap station transported to the new house... I just reattached it to the door, tidied it up a bit, and was good to go!
Baskets 1-3: Assorted ribbons
Basket 4: Gift tags & ribbon remnants
Basket 5: Gift bags & tissue, pail of tapes & scissors
The magnet strip is great for holding canisters of smaller tags, and notes like birthday reminders.

Basket 6: Wrapping paper
Tip: To hold tall tubes of paper, use a deep basket at the bottom, and a gift wrap rack for the top.
Clearly I share Jen's weakness for pretty papers, and HomeGoods just feeds my addiction!
I'll admit, these organized doors are now part of the tour when friends come by to see the new house... And I may open them with Vanna White flair! #okayItotallydo (We're looking at the doors, not the inside of the closet!)
Well obviously, now you're looking at the inside of the closet... that will be Phase 2.... Let's focus on the delightfulness of Phase 1 for now! I'm just thrilled to have all our craft and wrapping supplies out of boxes, and at our fingertips! And I crossed the biggest hurdle... Getting started!!
Do you let your fear of imperfection keep you from even getting started on projects? I'm learning that the worst thing that could happen is I have to start over later... And who said that's a bad thing?! ;) Thanks for letting me stop by.... Happy organizing, lovebugs!
See more of our Organized Spaces here, and Home Tour here.
"Hi, I'm Cassie, a DIY and design-obsessed Texas girl, and lover of travel, fashion, sarcasm and Mexican food. When I'm not hanging with my sweet and funny family, you can find me kicking the '80s out of our home, one budget project at a time, on my blog Hi Sugarplum!"
Thursday, November 26, 2015
UHeart Organizing: Off-The-Hook Office Nook!
By now, you know I crush hard on office nooks. There is something so invigorating and inspiring about taking a super small and often times underutilized area, and making it fantastically functional. My superstar friend, Cassie from Hi Sugarplum, is stopping by to show us how she did just that. Wait until you see this transformation and use of space... It is truly divine!

Hello you fellow lovers of all things organized! I'm thrilled to be here today sharing a space that has been years in the making. Yep, I said years! Whether it's because of life or my design-ADD, projects don't always move fast around here. But I'm okay with that...it allows me to really enjoy the process, and develop the space to fit our needs best. {Are you buying that? Yeah, me neither.}
And what we needed was a multipurpose work/homework/blog/craft space. I didn't like the idea of being secluded in another room, not to mention, I wanted easy access to see what the kids are doing online. So that means we needed to carve out a nook in the Family Room.
So I'll start you at the beginning....our Family Room had this sweet 1980s wet bar that we used a grand total of never.

Then we enclosed it {along with changing the paint color} and had a more useable, yet dreary, little corner.

So I built some Distressed Floating Shelves and a Chunky Desktop, and added some cute desk accessories and things were improving.

Then we accidentally bought a big-screen TV during a holiday sale. And it had to be mounted over the fireplace. Which meant the shelves needed to hold all the TV/Media equipment, too. And on top of all that, because it's such a visible area, we wanted it to look tidy and fit the design of the rest of the room. I mean, really, that's a lot to ask of a little nook.

So you can understand why I'm so excited to finally have the space meet every criteria we ever threw at it.


Between the TV equipment and computer, there's a lot of black going on...so I added a cheerful fabric to brighten up the corner. I wasn't about to unhook all the electronics, so I used oversized decorative tacks to hang the fabric on the back wall {no adhesive necessary!}. This also allows my design-ADD free reign to easily switch it up.


Remember it's a work/blog/homework/craft spot? Along with TV equipment and essentials. And since we spend so much time here, we want it to feel happy and inspiring. Let's take a tour, shall we, and I'll link sources to items and projects.

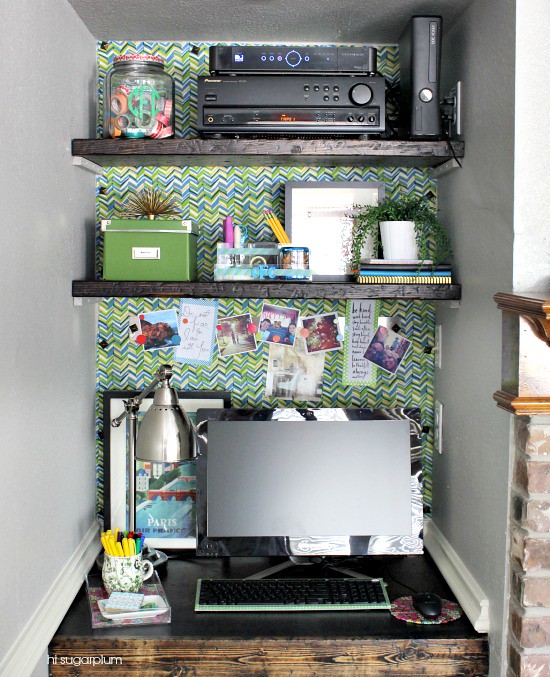
The desk top holds the computer, task light, writing essentials...and treasures. And the keyboard easily tucks away when we need a small working surface.

I lined this acrylic tray with decorative duck tape, then added this mug for pens and markers.

Everything is fancier with gold, so I gilded my business cards.

I took a cue from Megan and covered my mousepad with more duck tape, and even added washi to the keyboard.

The Paris print is a bit distracting since glancing at it usually gets me daydreaming about this trip.

I wanted to be able to rotate pictures and inspiration, so I hung this magnetic strip with tacks on the wall behind the computer.

Right now it holds favorite InstaGram snapshots {I'm @cassiesugarplum, if you want to follow me}, and encouraging words. Those I just print out and frame with washi tape.

The top shelf holds notebooks, my planner, and more office/craft supplies.
I turned this organizer into a cute desk accessory here. It holds stapler, paper clips, pencils and sharpener, hole punches, stamps and ink pad. I love having it all in one spot here...it cuts down on the, 'Mooooooooooooom! Where's the stapler??'

The art was this simple project using a postcard and some thumbtacks.

The left side holds our collection of washi tape and DVDs.

This single box holds over 100 movies and games, thanks to our new organizing system. The brass urchin is a favorite from Furbish.

I'll monogram anything not moving, so of course I added one to this craft jar.

This little corner of the Family Room has come a long way...and is now a useful and cherry corner we all love.


Oh, and notice how there's no cords hanging? That's a special trick I'll share on my blog soon. You can read how I hide lamp cords here.


Do you have an area of your home that's pulling double, or even triple, duty?! Thanks for letting me share our hard-working space!


"Hi, I'm Cassie, a DIY and design-obsessed Texas girl, and lover of travel, fashion, sarcasm and Mexican food. When I'm not hanging with my sweet and funny family, you can find me kicking the '80s out of our home, one budget project at a time, on my blog Hi Sugarplum!"
Read more »
Hello you fellow lovers of all things organized! I'm thrilled to be here today sharing a space that has been years in the making. Yep, I said years! Whether it's because of life or my design-ADD, projects don't always move fast around here. But I'm okay with that...it allows me to really enjoy the process, and develop the space to fit our needs best. {Are you buying that? Yeah, me neither.}
And what we needed was a multipurpose work/homework/blog/craft space. I didn't like the idea of being secluded in another room, not to mention, I wanted easy access to see what the kids are doing online. So that means we needed to carve out a nook in the Family Room.
So I'll start you at the beginning....our Family Room had this sweet 1980s wet bar that we used a grand total of never.
Then we enclosed it {along with changing the paint color} and had a more useable, yet dreary, little corner.
So I built some Distressed Floating Shelves and a Chunky Desktop, and added some cute desk accessories and things were improving.
Then we accidentally bought a big-screen TV during a holiday sale. And it had to be mounted over the fireplace. Which meant the shelves needed to hold all the TV/Media equipment, too. And on top of all that, because it's such a visible area, we wanted it to look tidy and fit the design of the rest of the room. I mean, really, that's a lot to ask of a little nook.
So you can understand why I'm so excited to finally have the space meet every criteria we ever threw at it.
Between the TV equipment and computer, there's a lot of black going on...so I added a cheerful fabric to brighten up the corner. I wasn't about to unhook all the electronics, so I used oversized decorative tacks to hang the fabric on the back wall {no adhesive necessary!}. This also allows my design-ADD free reign to easily switch it up.
Remember it's a work/blog/homework/craft spot? Along with TV equipment and essentials. And since we spend so much time here, we want it to feel happy and inspiring. Let's take a tour, shall we, and I'll link sources to items and projects.
The desk top holds the computer, task light, writing essentials...and treasures. And the keyboard easily tucks away when we need a small working surface.
I lined this acrylic tray with decorative duck tape, then added this mug for pens and markers.
Everything is fancier with gold, so I gilded my business cards.
I took a cue from Megan and covered my mousepad with more duck tape, and even added washi to the keyboard.
The Paris print is a bit distracting since glancing at it usually gets me daydreaming about this trip.
I wanted to be able to rotate pictures and inspiration, so I hung this magnetic strip with tacks on the wall behind the computer.
Right now it holds favorite InstaGram snapshots {I'm @cassiesugarplum, if you want to follow me}, and encouraging words. Those I just print out and frame with washi tape.
The top shelf holds notebooks, my planner, and more office/craft supplies.
I turned this organizer into a cute desk accessory here. It holds stapler, paper clips, pencils and sharpener, hole punches, stamps and ink pad. I love having it all in one spot here...it cuts down on the, 'Mooooooooooooom! Where's the stapler??'
The art was this simple project using a postcard and some thumbtacks.
The left side holds our collection of washi tape and DVDs.
This single box holds over 100 movies and games, thanks to our new organizing system. The brass urchin is a favorite from Furbish.
I'll monogram anything not moving, so of course I added one to this craft jar.
This little corner of the Family Room has come a long way...and is now a useful and cherry corner we all love.
Oh, and notice how there's no cords hanging? That's a special trick I'll share on my blog soon. You can read how I hide lamp cords here.
Do you have an area of your home that's pulling double, or even triple, duty?! Thanks for letting me share our hard-working space!


Subscribe to:
Posts (Atom)