Showing posts with label School. Show all posts
Showing posts with label School. Show all posts
Friday, November 27, 2015
Back To School Organization
I know we are a bit late to the Back to the School game, however, school doesn't start until next week here in good ol' Wisconsin. And I am in no rush to send my daily buddies back, so it has been a bit of a challenge switching gears around here.
But it had to be done. I like to prepare a week or two ahead of time with things, so when the first day of school finally does arrive, it isn't complete chaos.
Not too much has changed when it comes to our systems with organizing and back to school, however, there were a few things that we tweaked from last year, in hopes of an even smoother year this year.
First up, a lunch station.
Two years ago we created a lunch station for our fridge. It was a sammy makin' kit, and also had some sides, all in one place. We have loved this system like crazy since the day we implemented it.


The basket contains fresh fruit and veggies, sliced cheese, lunch meat and dips and spreads.

Since it was working so very well, this year I questioned why we didn't do something similar for the dry portion of the lunch packing and making. We had sammy cutters and apple slicers in the drawer, a basket for breads and a basket for snacks in the pantry, lunch boxes in the kid's cubbies.... everything was scattered and although the basket in the fridge rocked, the rest of the system still seemed a little silly.
So I analyzed our cabinets and there is one that is typically a thorn in my side and is where we keep the kid's containers for their lunch boxes... along with other random items that we use for entertaining....

I guess I should have offered up a bit of warning before opening and sharing this awful cabinet. So many items that are only used every once in awhile, and it all just gets stuffed where there is an opening. I always duck when I open the cabinet... just in case....
So I took everything out, and decided to reclaim the cabinet as our new kid's cabinet/lunch making station.

SO much better. And it seems simple enough to maintain now. All of the entertaining items, are now sitting on top of our sideboard in the dining room, waiting for a home. Don't you just love how one organizing project trickles to another?
But back to the lunch cabinet. I added washi tape and labels to the shelves to help the entire family stay on the same page, since we will all be using the cabinet.

The middle shelf holds all of the containers for the lunch boxes. Dividers and sandwich keepers and their thermoses. I also tossed napkins and sammy cutters there as well, instead of in the drawers below.

The bottom shelf holds a basket with breads, wraps, crackers and peanut butter. Those are the sammy making items.

And the containers next to the basket hold the dry side items. Although we also use some of those items for snacks, I divided them out to keep some in this cabinet as well. That way, it is all in one happy place.

The top shelf holds all of the lunch boxes now, and stackable bins for some of the smaller things like...

Blank note cards and pens for writing little love notes to stick in their lunches. Yeah, I am that mom....

Smaller utensils which fit nicely within their lunch boxes.

And reusable snack baggies, which are great for fruits, veggies and even dry snacks.
I also added some chalkboard vinyl on the inside of the cabinet {which is just a temporary option should I ever not want it there any longer}, so that we can write our lunch ideas and menu options there.
SO much better, and the cabinet actually has a purpose now! Wahoooooooo!

A few other things we did to get ready, is go through all of the boys clothing. This is the time of the year that I like to do an inventory, sort through hand-me-downs and see if the boys need any anything for school.

I counted every last item for each boy, did an inventory, and made a list for any items that needed to be purchased. That way, I am not going out shopping blindly and overspending on items we don't need.
We use the kid's closet to plan their weekly outfits during the school year, this worked pretty well last year so we are going to stick with it again this year.

We also dug out the morning and bedtime routine printables, and stuck them up in the boy's bedroom near their closet.

We started the routine a week before school starts, just to be sure, again, that we are all set for next Tuesday morning!
The final item we tweaked this year is the boy's study boxes, which live within their school cubbies.

The cubbies have also been working really really well for us. We clip all notes and papers that need attention for each boy, on the clipboard hanging from the door.

The baskets worked great for wet boots and winter items, and the backpacks are never lost in the morning when the bus drives up.

The idea with the study boxes, is that when it is homework time, each boy takes their personal box to the table to work from. It has all of the tools they need for homework, so there are no excuses or delays when it is time to get things done.

However, they very quickly became messy, and after I corralled all of the school supplies within a pencil pouch, they suddenly went missing and ended up in the car, and at grandma's and anywhere else the kiddos wanted to craft.... So when it was time to do homework, they still didn't have all of their items.
So this year, I found dollar silverware organizers at Target, and stuck them inside of the box.

The organizers keep the supplies nice and separate so they are not all mixed at the bottom of the box, yet not portable enough for them to go missing a week after use. Winner winner! I even managed to find supplies in three different colors, so each boy will always know which supplies belong to which boy.

The box is large enough that I also stick a notebook right on top, so there is scratch paper at homework time. Love it.
As far as storing papers I want to cherish and keep throughout the year, I am still loving our school paperwork system. For artwork, I have fallen in love with the Artkive iPhone app.

So there you have it. A round up of the few items we have been doing this past couple of days to prepare for the BIG day next week. And you can bet, I am savoring every last second with my boy's this week. I think I am empty nesting. The house is never the same when they are all gone throughout the day....

Psssst! You can find all school related posts here.
Read more »
But it had to be done. I like to prepare a week or two ahead of time with things, so when the first day of school finally does arrive, it isn't complete chaos.
Not too much has changed when it comes to our systems with organizing and back to school, however, there were a few things that we tweaked from last year, in hopes of an even smoother year this year.
First up, a lunch station.
Two years ago we created a lunch station for our fridge. It was a sammy makin' kit, and also had some sides, all in one place. We have loved this system like crazy since the day we implemented it.
The basket contains fresh fruit and veggies, sliced cheese, lunch meat and dips and spreads.
Since it was working so very well, this year I questioned why we didn't do something similar for the dry portion of the lunch packing and making. We had sammy cutters and apple slicers in the drawer, a basket for breads and a basket for snacks in the pantry, lunch boxes in the kid's cubbies.... everything was scattered and although the basket in the fridge rocked, the rest of the system still seemed a little silly.
So I analyzed our cabinets and there is one that is typically a thorn in my side and is where we keep the kid's containers for their lunch boxes... along with other random items that we use for entertaining....
I guess I should have offered up a bit of warning before opening and sharing this awful cabinet. So many items that are only used every once in awhile, and it all just gets stuffed where there is an opening. I always duck when I open the cabinet... just in case....
So I took everything out, and decided to reclaim the cabinet as our new kid's cabinet/lunch making station.
SO much better. And it seems simple enough to maintain now. All of the entertaining items, are now sitting on top of our sideboard in the dining room, waiting for a home. Don't you just love how one organizing project trickles to another?
But back to the lunch cabinet. I added washi tape and labels to the shelves to help the entire family stay on the same page, since we will all be using the cabinet.
The middle shelf holds all of the containers for the lunch boxes. Dividers and sandwich keepers and their thermoses. I also tossed napkins and sammy cutters there as well, instead of in the drawers below.
The bottom shelf holds a basket with breads, wraps, crackers and peanut butter. Those are the sammy making items.
And the containers next to the basket hold the dry side items. Although we also use some of those items for snacks, I divided them out to keep some in this cabinet as well. That way, it is all in one happy place.
The top shelf holds all of the lunch boxes now, and stackable bins for some of the smaller things like...
Blank note cards and pens for writing little love notes to stick in their lunches. Yeah, I am that mom....
Smaller utensils which fit nicely within their lunch boxes.
And reusable snack baggies, which are great for fruits, veggies and even dry snacks.
I also added some chalkboard vinyl on the inside of the cabinet {which is just a temporary option should I ever not want it there any longer}, so that we can write our lunch ideas and menu options there.
SO much better, and the cabinet actually has a purpose now! Wahoooooooo!
A few other things we did to get ready, is go through all of the boys clothing. This is the time of the year that I like to do an inventory, sort through hand-me-downs and see if the boys need any anything for school.
I counted every last item for each boy, did an inventory, and made a list for any items that needed to be purchased. That way, I am not going out shopping blindly and overspending on items we don't need.
We use the kid's closet to plan their weekly outfits during the school year, this worked pretty well last year so we are going to stick with it again this year.
We also dug out the morning and bedtime routine printables, and stuck them up in the boy's bedroom near their closet.
We started the routine a week before school starts, just to be sure, again, that we are all set for next Tuesday morning!
The final item we tweaked this year is the boy's study boxes, which live within their school cubbies.
The cubbies have also been working really really well for us. We clip all notes and papers that need attention for each boy, on the clipboard hanging from the door.
The baskets worked great for wet boots and winter items, and the backpacks are never lost in the morning when the bus drives up.
The idea with the study boxes, is that when it is homework time, each boy takes their personal box to the table to work from. It has all of the tools they need for homework, so there are no excuses or delays when it is time to get things done.
However, they very quickly became messy, and after I corralled all of the school supplies within a pencil pouch, they suddenly went missing and ended up in the car, and at grandma's and anywhere else the kiddos wanted to craft.... So when it was time to do homework, they still didn't have all of their items.
So this year, I found dollar silverware organizers at Target, and stuck them inside of the box.
The organizers keep the supplies nice and separate so they are not all mixed at the bottom of the box, yet not portable enough for them to go missing a week after use. Winner winner! I even managed to find supplies in three different colors, so each boy will always know which supplies belong to which boy.
The box is large enough that I also stick a notebook right on top, so there is scratch paper at homework time. Love it.
As far as storing papers I want to cherish and keep throughout the year, I am still loving our school paperwork system. For artwork, I have fallen in love with the Artkive iPhone app.
So there you have it. A round up of the few items we have been doing this past couple of days to prepare for the BIG day next week. And you can bet, I am savoring every last second with my boy's this week. I think I am empty nesting. The house is never the same when they are all gone throughout the day....
Psssst! You can find all school related posts here.

Thursday, November 26, 2015
Four Days & Four Drawers Mini Organizing Challenge: School Supply Drawer
Another day, another organized drawer. Yesterday's home office drawer was just what I needed to boost the functionality of today's drawer. With the boys starting school this week, we were in need of an organized school supply drawer to give them all of the necessary homework tools for a successful year. In the past we have purchased each boy individual sets of supplies and stored them within their own personal study boxes. Although the boxes work fairly well for a good part of the year, eventually supplies start missing, the boxes are left all over our home and cars and the contents become so jostled that they are no longer helpful to the boys. Now that we have a set of drawers near our dining room table (where our younger boys do their homework), I wanted to dedicate one of the drawers to their studies. This way I only had to purchase a single set of supplies and could expand the contents of the drawer to the types of items we found we needed during previous school years.

So as part of the Four Days & Four Drawers challenge, I knew it was perfect timing to get this drawer in top working order.

Because this drawer is new-to-us, there are no messy before pictures today. Just a blank slate.

The first step was to gather all of the supplies and dedicate organizers to fit those supplies. I went with my go-to dividers because they come in a variety of sizes to customize our layout (and once again, I love the durability, versatility and cleanliness they provide). Here is another fun animation to show the evolution of the main portion of the drawer (I think I am officially in love with .gif making).
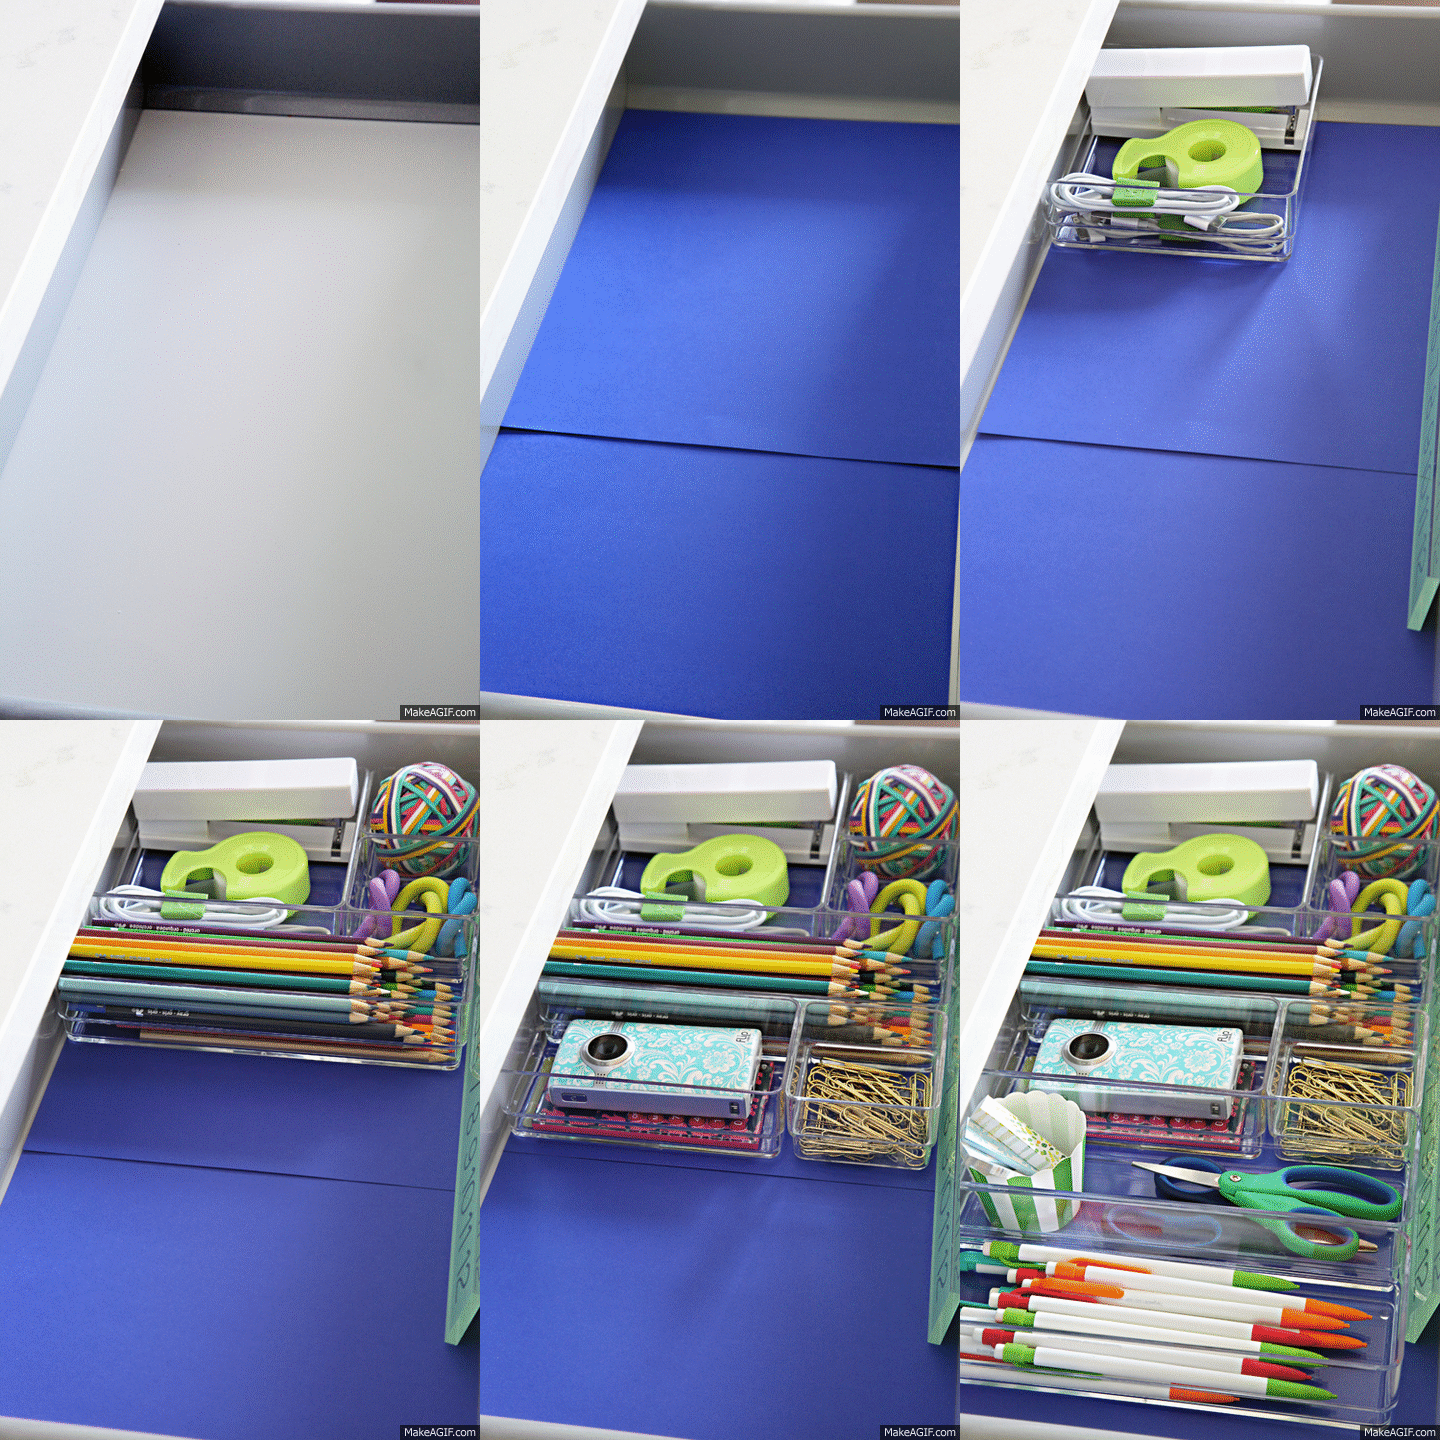
This time around I just lined the drawer with some blue cardstock to anchor the acrylic and colorful supplies. After the initial set of organizers went in, I started getting happy goosebumps.

However, as I started planning this project, I realized that I had more supplies than I had room for in my drawer. I also realized that the amount of organizers and dividers I had were not all going to fit. These drawers are not as deep as what I am typically use to, measuring in at 9 1/2" deep x 20 1/2" wide. I had room for one set of dividers, but still had two more trays to factor in. But that is why yesterday's project was a good place to begin, because the concept allowed for me to re-think how to make the most of today's drawer.
What worked so well for me yesterday, was the ability to add a second layer of organization that still allowed me to easily access the first layer. The specific organizer I utilized with my filing cabinet drawer was not going to work for this setup, but that didn't mean I couldn't try to replicate the concept.
One "tray" was intended to hold loose leaf paper, a blank notebook and a few stacks of memo pads for extra note taking and scribbles. The tray was actually just part of an inexpensive acrylic box picture frame. The other tray was an organizer I picked up awhile back at HomeGoods and was nicely divided into smaller sections for those smaller items.

See how those two trays are now have enough clearance to place items below? The process was much more simple than I initially had planned. I am so excited about this!
Step one was to measure the width of the drawer and determine the height for the new trays to easily glide (and offer clearance for the items below). Once we had our measurements, we found a piece of scrap wood to cut to size.

Because our IKEA drawers have an odd angle where the bottom joins the walls, we cut the ledge at a 45 degree angle.

Like a glove!
Wanting a nice finished appearance that would just blend in with the face of the drawer, I grabbed some white vinyl (typically used with my die cutting machine). I could have also used paint, but didn't want to risk a sticky finish.

I then found some adhesive mounting strips that I cut and stuck to the front of the drawer.


Ten minutes later I had an edge for my organizers to sit and slide on.

The back of the trays rested nicely on the back side of the drawer (but we easily could have mimicked this idea on the back side if necessary). To prevent them from falling behind the drawer, I added some sticky feet to the bottoms.


And now we have double the school supply storage area in a single drawer.

Here is a side angle to show the drawer closing without any height issues or hangups.

Another animation? OK!
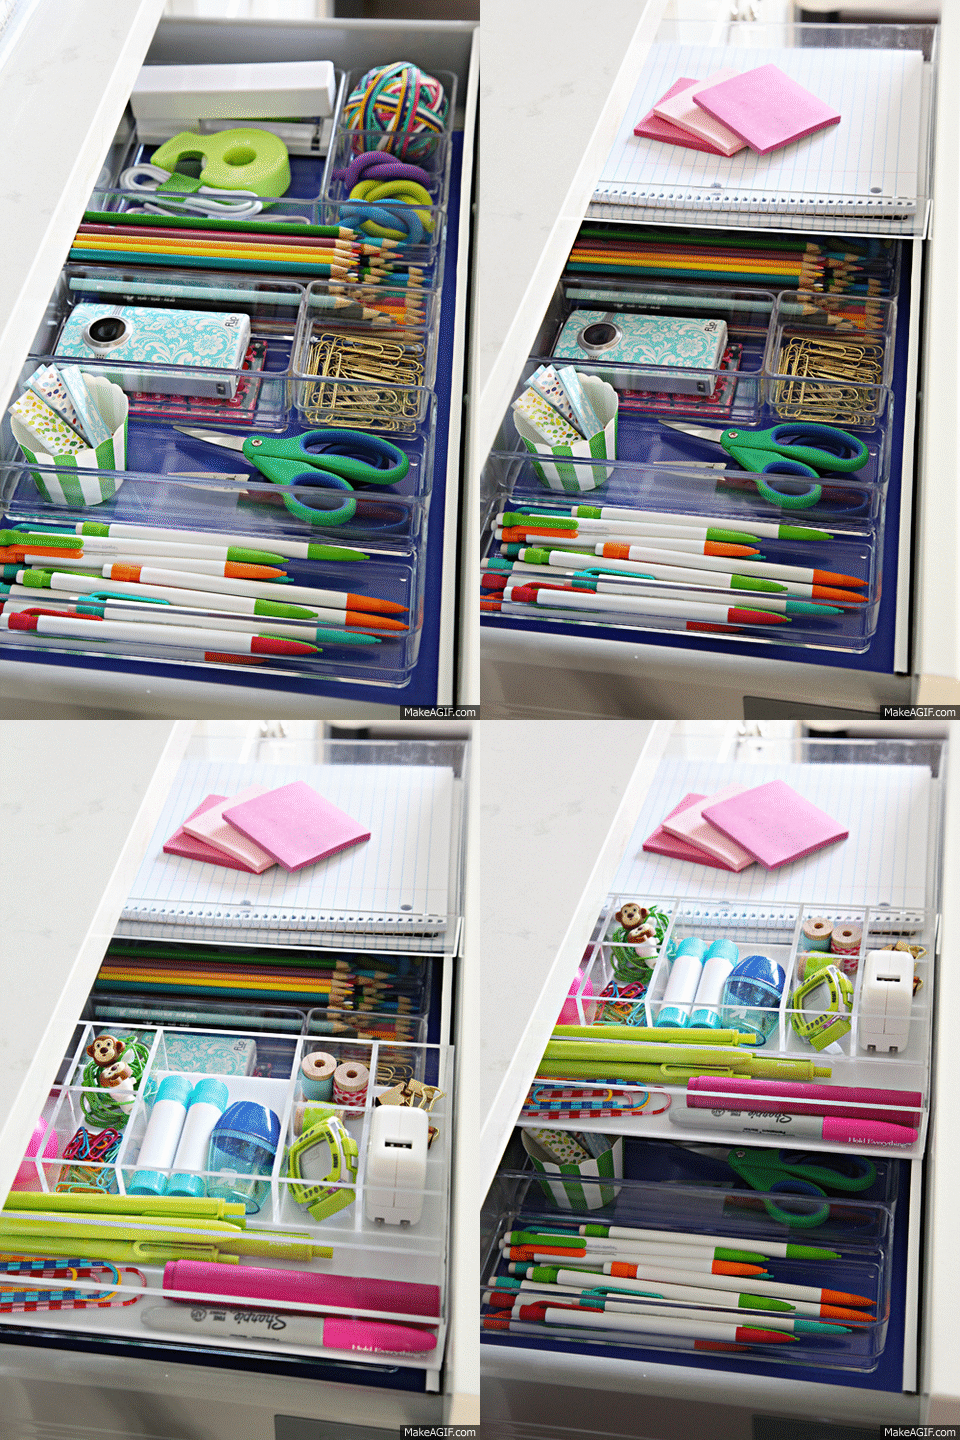
Here is a detailed list of the contents of our study drawer:


Everything is easy to find and I love that the organizers can swiftly move to the table and be put right back. I have a feeling this is going to become the most utilized drawer in our home. One day in and it has already been a definite hot spot for our boys.
Don't forget that you can join in on the challenge with me! Small organizing projects are contagious and motivating and I am still on fire to tackle two more drawers. I hope some of you are excited to take on a drawer or two as well. Friday will be "link up" day and you can also share your photos with me anytime via Instagram with the #4drawers4days hashtag.
Read more »
So as part of the Four Days & Four Drawers challenge, I knew it was perfect timing to get this drawer in top working order.
Because this drawer is new-to-us, there are no messy before pictures today. Just a blank slate.
The first step was to gather all of the supplies and dedicate organizers to fit those supplies. I went with my go-to dividers because they come in a variety of sizes to customize our layout (and once again, I love the durability, versatility and cleanliness they provide). Here is another fun animation to show the evolution of the main portion of the drawer (I think I am officially in love with .gif making).
This time around I just lined the drawer with some blue cardstock to anchor the acrylic and colorful supplies. After the initial set of organizers went in, I started getting happy goosebumps.
However, as I started planning this project, I realized that I had more supplies than I had room for in my drawer. I also realized that the amount of organizers and dividers I had were not all going to fit. These drawers are not as deep as what I am typically use to, measuring in at 9 1/2" deep x 20 1/2" wide. I had room for one set of dividers, but still had two more trays to factor in. But that is why yesterday's project was a good place to begin, because the concept allowed for me to re-think how to make the most of today's drawer.
What worked so well for me yesterday, was the ability to add a second layer of organization that still allowed me to easily access the first layer. The specific organizer I utilized with my filing cabinet drawer was not going to work for this setup, but that didn't mean I couldn't try to replicate the concept.
One "tray" was intended to hold loose leaf paper, a blank notebook and a few stacks of memo pads for extra note taking and scribbles. The tray was actually just part of an inexpensive acrylic box picture frame. The other tray was an organizer I picked up awhile back at HomeGoods and was nicely divided into smaller sections for those smaller items.
See how those two trays are now have enough clearance to place items below? The process was much more simple than I initially had planned. I am so excited about this!
Step one was to measure the width of the drawer and determine the height for the new trays to easily glide (and offer clearance for the items below). Once we had our measurements, we found a piece of scrap wood to cut to size.
Because our IKEA drawers have an odd angle where the bottom joins the walls, we cut the ledge at a 45 degree angle.
Like a glove!
Wanting a nice finished appearance that would just blend in with the face of the drawer, I grabbed some white vinyl (typically used with my die cutting machine). I could have also used paint, but didn't want to risk a sticky finish.
I then found some adhesive mounting strips that I cut and stuck to the front of the drawer.
Ten minutes later I had an edge for my organizers to sit and slide on.
The back of the trays rested nicely on the back side of the drawer (but we easily could have mimicked this idea on the back side if necessary). To prevent them from falling behind the drawer, I added some sticky feet to the bottoms.
And now we have double the school supply storage area in a single drawer.
Here is a side angle to show the drawer closing without any height issues or hangups.
Another animation? OK!
Here is a detailed list of the contents of our study drawer:
- Mechanical pencils
- Scissors
- Page flags
- Calculator
- Flip cam (for school projects)
- Paperclips
- Colored pencils
- Charging cords/brick
- Tape
- Erasers
- Stapler
- Rubberbands
- Ruler
- Sharpie
- Highlighter
- Pens
- Large Paperclips
- Small Paperclips
- Earbuds
- Glue sticks
- Pencil sharpener
- Stopwatch/timer
- Washi tape
- Butterfly clips
- Loose leaf paper
- Spiral notebook
- Memo pads
Everything is easy to find and I love that the organizers can swiftly move to the table and be put right back. I have a feeling this is going to become the most utilized drawer in our home. One day in and it has already been a definite hot spot for our boys.
Don't forget that you can join in on the challenge with me! Small organizing projects are contagious and motivating and I am still on fire to tackle two more drawers. I hope some of you are excited to take on a drawer or two as well. Friday will be "link up" day and you can also share your photos with me anytime via Instagram with the #4drawers4days hashtag.
Sunday, November 15, 2015
A Painted & Organized IKEA Armoire
This weekend I finally got started on a project that I was intending to do almost a year ago! Do you have some of those? I have actually have quite a few of those so it feels good to have one checked off of the list.
Recently Preston got the urge to rearrange his bedroom and I decided that it was time to finish up a few things we had started awhile back. Being that he is such a content and happy kid, his room has been a bit neglected and put on the back burner for too long now. He probably would have been fine just leaving well enough alone even now, but I think he deserves a space that is bumped up a notch. We started last week with a nice little study organizer DIY, which cleared off his desk to provide ample space for homework. This week we focused on his clothing closet.

Back in 2010, we gave Preston a closet office as an exciting and special place for him to work on his homework, read and play on the computer. Over the years if he would go missing, we would find him there. It was "his" special place and we could tell that although giving up a closet isn't a normal or ideal setup for most, it was the right one for him.
After we took away his traditional closet to be used as an office, he stored his clothing in a hand-me-down dresser for a few years, but eventually outgrew it. We added it to our master bedroom and it now stores all of our bedding and lower level linens. That left Preston in need of a new clothing storage solution. We asked him if he wanted to give up his closet desk area and he looked at us like we were aliens from a land far, far away. So we decided to purchase him an armoire from IKEA and let him keep his happy place.

At the time, the armoire we selected was only available in white or black-brown. I didn't think white was the way to go in a teen boy room, so we went with the darker option. Only problem was that once it was placed and setup in his room, it turned into a big dark hole.

It fit in his room fine, and most of the time I prefer the organizational options of an armoire over a traditional closet space. However, it was heavy to the eye and during most times of the day, the darkness made it challenging to see the contents of the closet.
So we decided to move it and paint it.
I asked Preston his favorite color and when he said dark turquoise, I was a little surprised (and secretly excited). And then I looked at his wardrobe and noticed we were already on the right color track with his bedroom; greens, blues, grays and turquoise. Perfect!

But he already had orange stripe curtains which he also said he really liked, and he opted to keep them as well. So, I am planning on sticking with the same colors we have been using for the past few years, and injecting small hints of the turquoise as we move forward.
Painting the armoire turquoise was out for a few reasons, but mainly because I felt it would compete too much with the existing blue walls. So together we picked out a gray, it felt like a nice neutral color that would be versatile down the road and even work should he want to take the closet with him to a college dorm/apartment in a few years. (Did I just type a few years!?)
I have painted a few pieces of IKEA furniture in the past with very few issues, so I wasn't too nervous for this project going in. However, I didn't want to risk painting the entire interior of the closet, just in case I wasn't getting good coverage and because of the wear and traffic it would be receiving right away.
For these types of projects I typically use an oil-based Zinsser primer, and I love it. But for this project I grabbed our water-based Zinsser Smart Prime because I liked how it worked on our built-in fireplace and also appreciate that it is low odor when painting indoors.

I taped and cleaned both the armoire and the doors, and used a smooth foam roller to apply the primer.

After the primer was dry and cured per the can recommendation, I went to my "go to" furniture paint which is Sherwin Williams ProClassic enamel. This stuff has held up beautifully on our painted hutch and our IKEA shoe cabinet. The color we selected was Gray Matters.

This time I cut in on the armoire and door panels and Preston rolled, it was nice to work on this project together.


When we finished, I noticed that although we had held a swatch up to both the blue and gray areas of his bedroom, the new gray was blending quite a bit with the upper wall gray. I went to the top of the Gray Matters swatch and picked up a gallon of Nebulous White, and painted both the upper portion of the bedroom wall as well as the entire ceiling.

That wasn't planned and set me back a day, but it was definitely the right thing to try. Something is still a little lack-luster, and we may do a fun pattern on the upper or lower portion of the wall, but I haven't completely decided on anything yet.

We relocated the armoire to the opposite side of his room, and now the light from the window actually helps to light the interior of the closet.

We also added a motion sensor light which now turns on automatically each time the doors are open. He thought that was the coolest part of this whole project. (I also thought this was a fun feature but I unplugged the light for the remainder of the photos because it was washing out my images).

To bring in the turquoise color, I thought it would be fun to paint his hangers. I love painted wooden hangers, we did the same in our laundry room and they have held up great (and the paint has never come off on our clothing). It is a great way to update the hangers from ones that my husband would use, to ones that are fresh for a young teen.


When it came to the interior of the closet, we sorted through all of his clothing and he tried on everything from last year. This allowed us to come up with a very select shopping list for back-to-school this year. All of the items that don't fit head straight to his younger brothers. #lovethat

When we purchased the armoire, we added three drawers to the combination. These drawers are super-sized and also have that brilliant soft closing feature we all love about IKEA. For this project, I wanted to add some drawer dividers to allow Preston to "file" his clothing and easily find specific types of items. I was having a hard time coming up with something that would span the 22" distance of the drawer from front to back (especially something that didn't cost a fortune), so we made some ourselves.
We picked up two 6' pine boards from Home Depot and cut them each to the width of the drawers (for a total of 4, 29" pieces). We measured and marked the boards to prepare them for grooves which would allow us to adjust our divider sizes. Bryan ran the boards over his table saw, leaving a few inches between each groove he created.

The grooves along each board allowed us to insert thin wooden pieces as dividers (craft/hobby wood found at Home Depot). I asked him to space the grooves a few inches apart to allow us to customize and change the configuration in the future.

Quick Tip: It is OK to cut the grooves a bit wider and deeper than necessary to accommodate your wooden slats, especially if you plan to paint them. Above was our first round of cuts, but we ended up making each groove a bit wider and deeper for an easy fit.
Each grooved board was added to the front and back side of the drawer.

Then I inserted the thinner slats to accommodate specific clothing types.

We could have used one more board (which we will pick up during a future Home Depot visit), but this couldn't have worked out more perfect in the end!

The top row has his athletic and dry fit T-Shirts in the first slot, athletic shorts in the second slot (which I just laid out loosely), active pants in the third and swim trunks in the fourth.

The next drawer holds his shorts and dress pants in the first slot, his jeans in the next, pajamas in the third and specialty sport socks in the last.

The filing method is so fabulous and easy to work with, he will have no problem keeping up this system. And the dividers are a dream.

The next drawer holds a few canvas bins of everyday socks, underwear and his baseball uniform. And I definitely pick my battles when it comes to organizing kid's socks.

A hanging organizer for belts and ties...

A small bin to hold his deodorant and smelly spray...

And that completes the painted IKEA armoire tour!
With the movement of the armoire, I also added a wire wall organizer and bench nearby.

We screwed the organizer into a stud so it was nice and secure and can hold a heavy backpack each night. The added baskets are a great drop zone for all of the random items teen boys seem to have on them/with them all of the time.

Just below the basket is a storage bench, which we have had for years. Although not the prettiest or trendiest piece of furniture, it functions great as added seating when friends visit or "hang out" and as a place to toss pillows from his bed at night. And because he hosts a lot of sleepovers, we stocked the bench with an air mattress, bedding and a toiletry kit for his guests.

Quick Tip: Create a toiletry kit for sleepovers with the small items you receive at your dental visits (and be sure to swap out the toothbrush after each use).
This project brought us one step closer to increasing the functionality and organization in our teen boy's bedroom. Next on the list, a DIY headboard. #powertooltime
Update! I did want to mention that even after a couple of days of being painted, the drawers of the armoire seem to chip pretty easily which is a bit disappointing (and I don't remember that happening with the shoe cabinet or the hutch). I believe it may be the water-based primer (vs. the oil based I usually use), but I will be sure to update if things cure up for the better in the next few weeks.
Read more »
Recently Preston got the urge to rearrange his bedroom and I decided that it was time to finish up a few things we had started awhile back. Being that he is such a content and happy kid, his room has been a bit neglected and put on the back burner for too long now. He probably would have been fine just leaving well enough alone even now, but I think he deserves a space that is bumped up a notch. We started last week with a nice little study organizer DIY, which cleared off his desk to provide ample space for homework. This week we focused on his clothing closet.
Back in 2010, we gave Preston a closet office as an exciting and special place for him to work on his homework, read and play on the computer. Over the years if he would go missing, we would find him there. It was "his" special place and we could tell that although giving up a closet isn't a normal or ideal setup for most, it was the right one for him.
After we took away his traditional closet to be used as an office, he stored his clothing in a hand-me-down dresser for a few years, but eventually outgrew it. We added it to our master bedroom and it now stores all of our bedding and lower level linens. That left Preston in need of a new clothing storage solution. We asked him if he wanted to give up his closet desk area and he looked at us like we were aliens from a land far, far away. So we decided to purchase him an armoire from IKEA and let him keep his happy place.
At the time, the armoire we selected was only available in white or black-brown. I didn't think white was the way to go in a teen boy room, so we went with the darker option. Only problem was that once it was placed and setup in his room, it turned into a big dark hole.
It fit in his room fine, and most of the time I prefer the organizational options of an armoire over a traditional closet space. However, it was heavy to the eye and during most times of the day, the darkness made it challenging to see the contents of the closet.
So we decided to move it and paint it.
I asked Preston his favorite color and when he said dark turquoise, I was a little surprised (and secretly excited). And then I looked at his wardrobe and noticed we were already on the right color track with his bedroom; greens, blues, grays and turquoise. Perfect!
But he already had orange stripe curtains which he also said he really liked, and he opted to keep them as well. So, I am planning on sticking with the same colors we have been using for the past few years, and injecting small hints of the turquoise as we move forward.
Painting the armoire turquoise was out for a few reasons, but mainly because I felt it would compete too much with the existing blue walls. So together we picked out a gray, it felt like a nice neutral color that would be versatile down the road and even work should he want to take the closet with him to a college dorm/apartment in a few years. (Did I just type a few years!?)
I have painted a few pieces of IKEA furniture in the past with very few issues, so I wasn't too nervous for this project going in. However, I didn't want to risk painting the entire interior of the closet, just in case I wasn't getting good coverage and because of the wear and traffic it would be receiving right away.
For these types of projects I typically use an oil-based Zinsser primer, and I love it. But for this project I grabbed our water-based Zinsser Smart Prime because I liked how it worked on our built-in fireplace and also appreciate that it is low odor when painting indoors.
I taped and cleaned both the armoire and the doors, and used a smooth foam roller to apply the primer.
After the primer was dry and cured per the can recommendation, I went to my "go to" furniture paint which is Sherwin Williams ProClassic enamel. This stuff has held up beautifully on our painted hutch and our IKEA shoe cabinet. The color we selected was Gray Matters.
This time I cut in on the armoire and door panels and Preston rolled, it was nice to work on this project together.
When we finished, I noticed that although we had held a swatch up to both the blue and gray areas of his bedroom, the new gray was blending quite a bit with the upper wall gray. I went to the top of the Gray Matters swatch and picked up a gallon of Nebulous White, and painted both the upper portion of the bedroom wall as well as the entire ceiling.
That wasn't planned and set me back a day, but it was definitely the right thing to try. Something is still a little lack-luster, and we may do a fun pattern on the upper or lower portion of the wall, but I haven't completely decided on anything yet.
We relocated the armoire to the opposite side of his room, and now the light from the window actually helps to light the interior of the closet.
We also added a motion sensor light which now turns on automatically each time the doors are open. He thought that was the coolest part of this whole project. (I also thought this was a fun feature but I unplugged the light for the remainder of the photos because it was washing out my images).
To bring in the turquoise color, I thought it would be fun to paint his hangers. I love painted wooden hangers, we did the same in our laundry room and they have held up great (and the paint has never come off on our clothing). It is a great way to update the hangers from ones that my husband would use, to ones that are fresh for a young teen.
When it came to the interior of the closet, we sorted through all of his clothing and he tried on everything from last year. This allowed us to come up with a very select shopping list for back-to-school this year. All of the items that don't fit head straight to his younger brothers. #lovethat
When we purchased the armoire, we added three drawers to the combination. These drawers are super-sized and also have that brilliant soft closing feature we all love about IKEA. For this project, I wanted to add some drawer dividers to allow Preston to "file" his clothing and easily find specific types of items. I was having a hard time coming up with something that would span the 22" distance of the drawer from front to back (especially something that didn't cost a fortune), so we made some ourselves.
We picked up two 6' pine boards from Home Depot and cut them each to the width of the drawers (for a total of 4, 29" pieces). We measured and marked the boards to prepare them for grooves which would allow us to adjust our divider sizes. Bryan ran the boards over his table saw, leaving a few inches between each groove he created.
The grooves along each board allowed us to insert thin wooden pieces as dividers (craft/hobby wood found at Home Depot). I asked him to space the grooves a few inches apart to allow us to customize and change the configuration in the future.
Quick Tip: It is OK to cut the grooves a bit wider and deeper than necessary to accommodate your wooden slats, especially if you plan to paint them. Above was our first round of cuts, but we ended up making each groove a bit wider and deeper for an easy fit.
Each grooved board was added to the front and back side of the drawer.
Then I inserted the thinner slats to accommodate specific clothing types.
We could have used one more board (which we will pick up during a future Home Depot visit), but this couldn't have worked out more perfect in the end!
The top row has his athletic and dry fit T-Shirts in the first slot, athletic shorts in the second slot (which I just laid out loosely), active pants in the third and swim trunks in the fourth.
The next drawer holds his shorts and dress pants in the first slot, his jeans in the next, pajamas in the third and specialty sport socks in the last.
The filing method is so fabulous and easy to work with, he will have no problem keeping up this system. And the dividers are a dream.
The next drawer holds a few canvas bins of everyday socks, underwear and his baseball uniform. And I definitely pick my battles when it comes to organizing kid's socks.
A hanging organizer for belts and ties...
A small bin to hold his deodorant and smelly spray...
And that completes the painted IKEA armoire tour!
With the movement of the armoire, I also added a wire wall organizer and bench nearby.
We screwed the organizer into a stud so it was nice and secure and can hold a heavy backpack each night. The added baskets are a great drop zone for all of the random items teen boys seem to have on them/with them all of the time.
Just below the basket is a storage bench, which we have had for years. Although not the prettiest or trendiest piece of furniture, it functions great as added seating when friends visit or "hang out" and as a place to toss pillows from his bed at night. And because he hosts a lot of sleepovers, we stocked the bench with an air mattress, bedding and a toiletry kit for his guests.
Quick Tip: Create a toiletry kit for sleepovers with the small items you receive at your dental visits (and be sure to swap out the toothbrush after each use).
This project brought us one step closer to increasing the functionality and organization in our teen boy's bedroom. Next on the list, a DIY headboard. #powertooltime
Update! I did want to mention that even after a couple of days of being painted, the drawers of the armoire seem to chip pretty easily which is a bit disappointing (and I don't remember that happening with the shoe cabinet or the hutch). I believe it may be the water-based primer (vs. the oil based I usually use), but I will be sure to update if things cure up for the better in the next few weeks.
Subscribe to:
Posts (Atom)